service简介 Deployment可以创建一组Pod来提供具有高可用性的服务。
虽然每个Pod都会分配一个单独的Pod IP,然而却存在如下两问题:
Pod IP 会随着Pod的重建产生变化
Pod IP 仅仅是集群内可见的虚拟IP,外部无法访问
这样对于访问这个服务带来了难度。因此,kubernetes设计了Service来解决这个问题。【服务发现,负载均衡】
Service可以看作是一组同类Pod对外的访问接口 。借助Service,应用可以方便地实现服务发现和负载均衡。
操作一:创建集群内部可访问的Service
1
2
3
4
5
6
7
8
9
10
11
12
13
14
15
16
17
18
19
20
21
22
# 暴露Service [root@master ~]# kubectl expose deploy nginx --name=svc-nginx1 --type=ClusterIP --port=80 --target-port=80 -n dev service/svc-nginx1 exposed # 查看service [root@master ~]# kubectl get svc svc-nginx1 -n dev -o wide NAME TYPE CLUSTER-IP EXTERNAL-IP PORT(S) AGE SELECTOR svc-nginx1 ClusterIP 10.109.179.231 <none> 80/TCP 3m51s run=nginx # 这里产生了一个CLUSTER-IP,这就是service的IP,在Service的生命周期中,这个地址是不会变动的 # 可以通过这个IP访问当前service对应的POD [root@master ~]# curl 10.109.179.231:80 <!DOCTYPE html> <html> <head> <title>Welcome to nginx!</title> </head> <body> <h1>Welcome to nginx!</h1> ....... </body> </html>
操作二:创建集群外部也可访问的Service
1
2
3
4
5
6
7
8
9
10
11
12
13
# 上面创建的Service的type 类型为ClusterIP,这个ip地址只用集群内部可访问 # 如果需要创建外部也可以访问的Service,需要修改type 为NodePort [root@master ~]# kubectl expose deploy nginx --name=svc-nginx2 --type=NodePort --port=80 --target-port=80 -n dev service/svc-nginx2 exposed # 此时查看,会发现出现了NodePort类型的Service,而且有一对Port(80:31928/TC) [root@master ~]# kubectl get svc svc-nginx2 -n dev -o wide NAME TYPE CLUSTER-IP EXTERNAL-IP PORT(S) AGE SELECTOR svc-nginx2 NodePort 10.100.94.0 <none> 80:31928/TCP 9s run=nginx # 接下来就可以通过集群外的主机访问 节点IP:31928访问服务了 # 例如在的电脑主机上通过浏览器访问下面的地址 http://192.168.5.4:31928/
删除Service
1 [root@master ~]# kubectl delete svc svc-nginx-1 -n dev service "svc-nginx-1" deleted
配置方式
创建一个svc-nginx.yaml,内容如下:
1
2
3
4
5
6
7
8
9
10
11
12
13
14
apiVersion: v1 kind: Service metadata: name: svc-nginx namespace: dev spec: clusterIP: 10.109 .179 .231 ports: - port: 80 protocol: TCP targetPort: 80 selector: run: nginx type: ClusterIP
然后就可以执行对应的创建和删除命令了:
创建:kubectl create -f svc-nginx.yaml
删除:kubectl delete -f svc-nginx.yaml
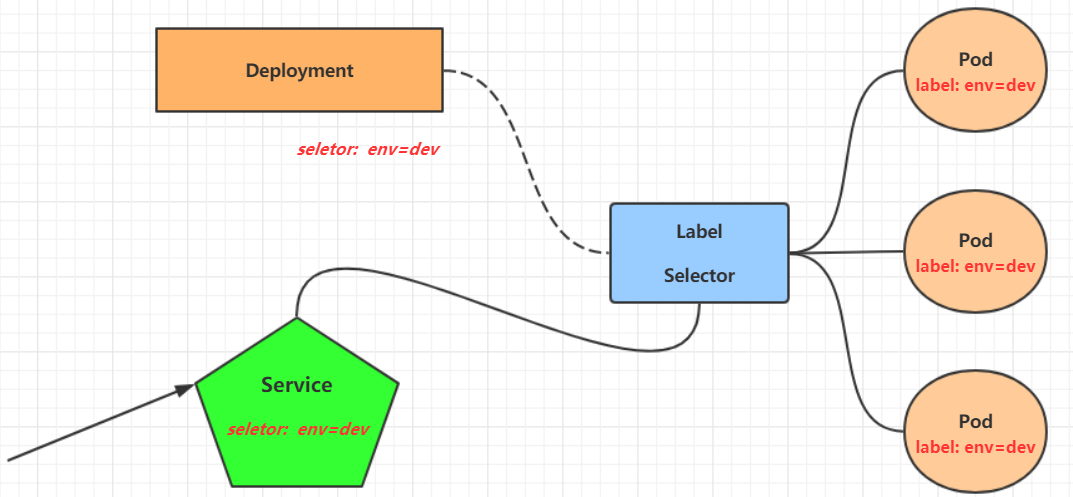
如何理解service与deploy的关系? 创建两个label相同的deploy
1
2
3
4
5
6
7
8
9
10
11
12
13
14
15
16
17
18
19
20
21
apiVersion: apps/v1 kind: Deployment metadata: name: pc-deployment namespace: dev spec: replicas: 3 selector: matchLabels: app: nginx-pod template: metadata: labels: app: nginx-pod spec: containers: - name: nginx image: nginx:1.17.1 ports: - containerPort: 80
1
2
3
4
5
6
7
8
9
10
11
12
13
14
15
16
17
18
19
20
21
apiVersion: apps/v1 kind: Deployment metadata: name: pc-deployment1 namespace: dev spec: replicas: 3 selector: matchLabels: app: nginx-pod template: metadata: labels: app: nginx-pod spec: containers: - name: nginx image: nginx:1.17.1 ports: - containerPort: 80
这两个deploy除了deployName不一致,其他都是一致的。
再 kubectl expose deploy pc-deployment --name=aa --target-port=80 --port=80 -n dev 其中的一个deploy暴露为service,然后可以看到两个deploy的节点都出现在了这个svc的服务中。另外轮询访问这个svc也会发现两个deploy节点都会出现。
1
2
3
4
5
6
7
8
9
10
11
12
13
14
15
16
17
18
19
[root@localhost svs]# kubectl describe svc aa -n dev Name: aa Namespace: dev Labels: <none> Annotations: <none> Selector: app=nginx-pod Type: ClusterIP IP Family Policy: SingleStack IP Families: IPv4 IP: 10.43.74.29 IPs: 10.43.74.29 Port: <unset> 80/TCP TargetPort: 80/TCP Endpoints: 10.42.0.18:80,10.42.0.19:80,10.42.0.20:80 + 3 more... Session Affinity: None Events: <none> [root@localhost svs]#
测试2
分别有两个deploy,部署了nginx和tomcat,但是他们有相同的label。这时候部署一个svc,selector使用一样的标签,这个能捕获到这两个deploy。
这个配置方式是有问题的,只用来说明svc对deploy的捕获关系。
svc对后端的两个pod的ip做负载均衡。
当svc暴露了一个以上的port时,需要给port命名。
1
2
3
4
5
6
7
8
9
10
11
12
13
14
15
16
17
18
19
20
21
22
23
24
25
26
27
28
29
30
31
32
33
34
35
36
37
38
39
40
41
42
kind: Deployment apiVersion: apps/v1 metadata: name: deploy-nginx namespace: dev spec: selector: matchLabels: xixi: haha replicas: 1 template: metadata: labels: xixi: haha name: xxxxx spec: containers: - name: nginx image: nginx ports: - containerPort: 80 apiVersion: apps/v1 kind: Deployment metadata: name: tomcat namespace: dev spec: replicas: 1 selector: matchLabels: xixi: haha template: metadata: labels: xixi: haha spec: containers: - image: tomcat name: tomcat ports: - containerPort: 8080 protocol: TCP
1
2
3
4
5
6
7
8
9
10
11
12
13
14
15
16
kind: Service apiVersion: v1 metadata: name: aa namespace: dev spec: selector: xixi: haha type: ClusterIP ports: - port: 89 name: test1 targetPort: 80 - port: 90 name: test2 targetPort: 8080
1
2
3
4
5
6
7
8
9
10
11
12
13
14
15
16
17
18
19
20
21
22
23
24
25
[root@VM-16-5-centos service]# kubectl get ep -n dev NAME ENDPOINTS AGE aa 10.42.0.113:8080,10.42.0.114:8080,10.42.0.113:80 + 1 more... 18h 可以看到,这个svc给后端的pod做了负载均衡,两个pod的ip*两个端口。这样能更好的理解:svc是对pod ip的负载均衡。 [root@VM-16-5-centos service]# kubectl describe svc aa -n dev Name: aa Namespace: dev Labels: <none> Annotations: <none> Selector: xixi=haha Type: ClusterIP IP Family Policy: SingleStack IP Families: IPv4 IP: 10.43.100.155 IPs: 10.43.100.155 Port: test1 89/TCP TargetPort: 80/TCP Endpoints: 10.42.0.113:80,10.42.0.114:80 Port: test2 90/TCP TargetPort: 8080/TCP Endpoints: 10.42.0.113:8080,10.42.0.114:8080 Session Affinity: None Events: <none>
注意:
deploy的selector下是分:matchLabels和matchExpressions的
svc的selector下没有这两个字段,直接写 key value
Service详解 7.1 Service介绍 在kubernetes中,pod是应用程序的载体,我们可以通过pod的ip来访问应用程序,但是pod的ip地址不是固定的,这也就意味着不方便直接采用pod的ip对服务进行访问。
为了解决这个问题,kubernetes提供了Service资源,Service会对提供同一个服务的多个pod进行聚合,并且提供一个统一的入口地址。通过访问Service的入口地址就能访问到后面的pod服务。
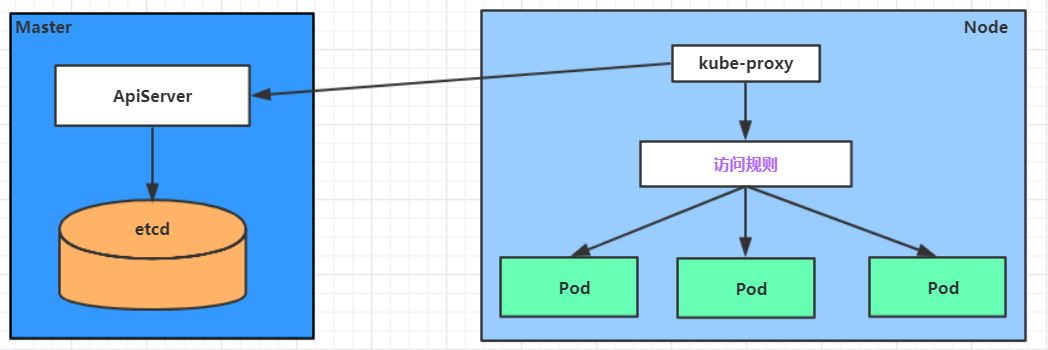
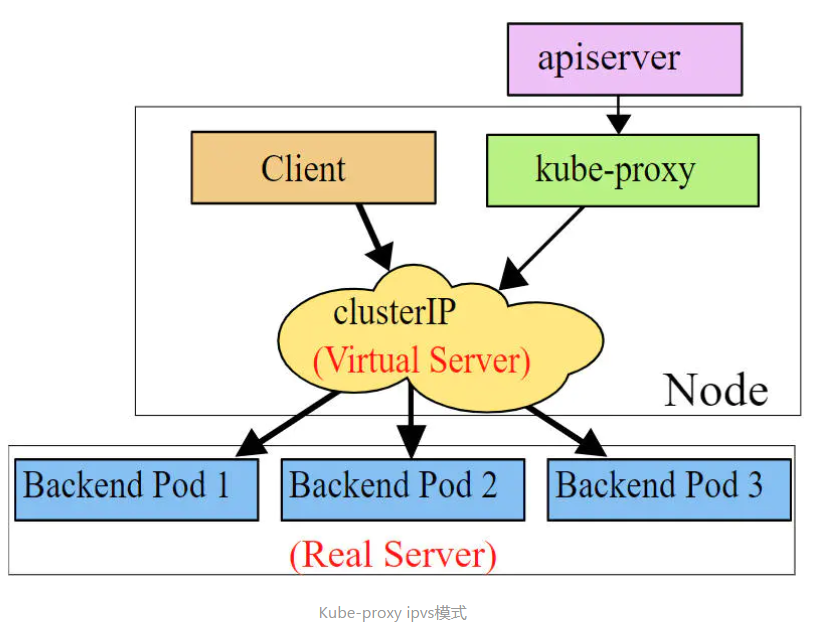
Service在很多情况下只是一个概念,真正起作用的其实是kube-proxy服务进程,每个Node节点上都运行着一个kube-proxy服务进程。当创建Service的时候会通过api-server向etcd写入创建的service的信息,而kube-proxy会基于监听的机制发现这种Service的变动,然后它会将最新的Service信息转换成对应的访问规则 。
1
2
3
4
5
6
7
8
9
10
11
12
# 10.97.97.97:80 是service提供的访问入口 # 当访问这个入口的时候,可以发现后面有三个pod的服务在等待调用, # kube-proxy会基于rr(轮询)的策略,将请求分发到其中一个pod上去 # 这个规则会同时在集群内的所有节点上都生成,所以在任何一个节点上访问都可以。 [root@node1 ~]# ipvsadm -Ln IP Virtual Server version 1.2.1 (size=4096) Prot LocalAddress:Port Scheduler Flags -> RemoteAddress:Port Forward Weight ActiveConn InActConn TCP 10.97.97.97:80 rr -> 10.244.1.39:80 Masq 1 0 0 -> 10.244.1.40:80 Masq 1 0 0 -> 10.244.2.33:80 Masq 1 0 0
将nginx的容器其中一个pod的html内容给改掉,访问svc的地址,即可以发现返回值是轮询出现的。
kube-proxy目前支持三种工作模式:
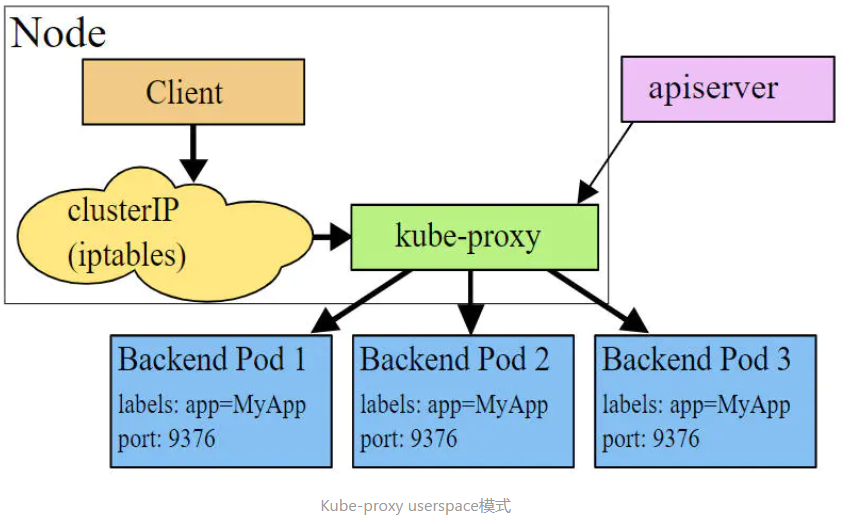
userspace 模式
userspace模式下,kube-proxy会为每一个Service创建一个监听端口,发向Cluster IP的请求被Iptables规则重定向到kube-proxy监听的端口上,kube-proxy根据LB算法选择一个提供服务的Pod并和其建立链接,以将请求转发到Pod上。 该模式下,kube-proxy充当了一个四层负责均衡器的角色。由于kube-proxy运行在userspace中,在进行转发处理时会增加内核和用户空间之间的数据拷贝,虽然比较稳定,但是效率比较低。
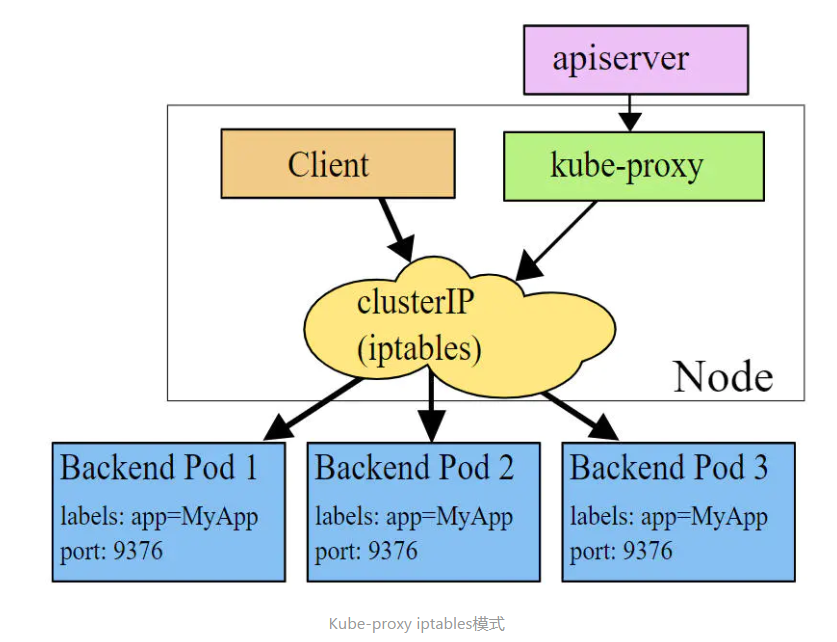
iptables 模式
iptables模式下,kube-proxy为service后端的每个Pod创建对应的iptables规则,直接将发向Cluster IP的请求重定向到一个Pod IP。 该模式下kube-proxy不承担四层负责均衡器的角色,只负责创建iptables规则。该模式的优点是较userspace模式效率更高,但不能提供灵活的LB策略,当后端Pod不可用时也无法进行重试。
ipvs 模式
ipvs模式和iptables类似,kube-proxy监控Pod的变化并创建相应的ipvs规则。ipvs相对iptables转发效率更高。除此以外,ipvs支持更多的LB算法。
1
2
3
4
5
6
7
8
9
10
11
12
13
# 此模式必须安装ipvs内核模块,否则会降级为iptables # 开启ipvs [root@k8s-master01 ~]# kubectl edit cm kube-proxy -n kube-system # 修改mode: "ipvs" [root@k8s-master01 ~]# kubectl delete pod -l k8s-app=kube-proxy -n kube-system [root@node1 ~]# ipvsadm -Ln IP Virtual Server version 1.2.1 (size=4096) Prot LocalAddress:Port Scheduler Flags -> RemoteAddress:Port Forward Weight ActiveConn InActConn TCP 10.97.97.97:80 rr -> 10.244.1.39:80 Masq 1 0 0 -> 10.244.1.40:80 Masq 1 0 0 -> 10.244.2.33:80 Masq 1 0 0
7.2 Service类型 Service的资源清单文件:
1
2
3
4
5
6
7
8
9
10
11
12
13
14
15
16
kind: Service apiVersion: v1 metadata: name: service namespace: dev spec: selector: app: nginx type: clusterIP: sessionAffinity: ports: - protocol: TCP port: 3017 targetPort: 5003 nodePort: 31122
ClusterIP:默认值,它是Kubernetes系统自动分配的虚拟IP,只能在集群内部访问
NodePort:将Service通过指定的Node上的端口暴露给外部,通过此方法,就可以在集群外部访问服务
LoadBalancer:使用外接负载均衡器完成到服务的负载分发,注意此模式需要外部云环境支持
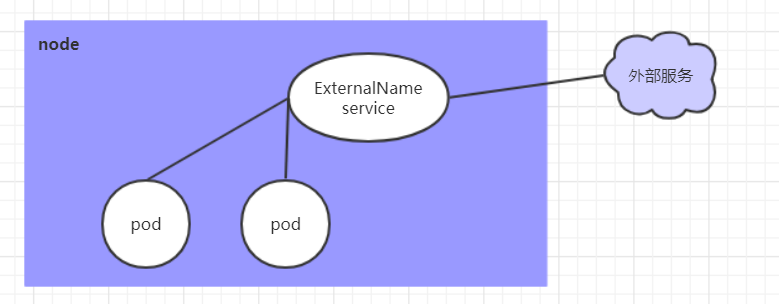
ExternalName: 把集群外部的服务引入集群内部,直接使用
7.3 Service使用 7.3.1 实验环境准备 在使用service之前,首先利用Deployment创建出3个pod,注意要为pod设置 app=nginx-pod的标签
创建deployment.yaml,内容如下:
deploy中template 必须存在
deploy的label和template中的lable必须一致
1
2
3
4
5
6
7
8
9
10
11
12
13
14
15
16
17
18
19
20
apiVersion: apps/v1 kind: Deployment metadata: name: pc-deployment namespace: dev spec: replicas: 3 selector: matchLabels: app: nginx-pod template: metadata: labels: app: nginx-pod spec: containers: - name: nginx image: nginx:1.17.1 ports: - containerPort: 80
1
2
3
4
5
6
7
8
9
10
11
12
13
14
15
16
17
18
19
20
21
[root@k8s-master01 ~]# kubectl create -f deployment.yaml deployment.apps/pc-deployment created # 查看pod详情 [root@k8s-master01 ~]# kubectl get pods -n dev -o wide --show-labels NAME READY STATUS IP NODE LABELS pc-deployment-66cb59b984-8p84h 1/1 Running 10.244.1.39 node1 app=nginx-pod pc-deployment-66cb59b984-vx8vx 1/1 Running 10.244.2.33 node2 app=nginx-pod pc-deployment-66cb59b984-wnncx 1/1 Running 10.244.1.40 node1 app=nginx-pod # 为了方便后面的测试,修改下三台nginx的index.html页面(三台修改的IP地址不一致) # kubectl exec -it pc-deployment-66cb59b984-8p84h -n dev /bin/sh # echo "10.244.1.39" > /usr/share/nginx/html/index.html# 修改完毕之后,访问测试 [root@k8s-master01 ~]# curl 10.244.1.39 10.244.1.39 [root@k8s-master01 ~]# curl 10.244.2.33 10.244.2.33 [root@k8s-master01 ~]# curl 10.244.1.40 10.244.1.40
7.3.2 ClusterIP类型的Service 创建service-clusterip.yaml文件
1
2
3
4
5
6
7
8
9
10
11
12
13
apiVersion: v1 kind: Service metadata: name: service-clusterip namespace: dev spec: selector: app: nginx-pod clusterIP: 10.97 .97 .97 type: ClusterIP ports: - port: 80 targetPort: 80
1
2
3
4
5
6
7
8
9
10
11
12
13
14
15
16
17
18
19
20
21
22
23
24
25
26
27
28
29
30
31
32
33
34
35
# 创建service [root@k8s-master01 ~]# kubectl create -f service-clusterip.yaml service/service-clusterip created # 查看service [root@k8s-master01 ~]# kubectl get svc -n dev -o wide NAME TYPE CLUSTER-IP EXTERNAL-IP PORT(S) AGE SELECTOR service-clusterip ClusterIP 10.97.97.97 <none> 80/TCP 13s app=nginx-pod # 查看service的详细信息 # 在这里有一个Endpoints列表,里面就是当前service可以负载到的服务入口 [root@k8s-master01 ~]# kubectl describe svc service-clusterip -n dev Name: service-clusterip Namespace: dev Labels: <none> Annotations: <none> Selector: app=nginx-pod Type: ClusterIP IP: 10.97.97.97 Port: <unset> 80/TCP TargetPort: 80/TCP Endpoints: 10.244.1.39:80,10.244.1.40:80,10.244.2.33:80 Session Affinity: None Events: <none> # 查看ipvs的映射规则 [root@k8s-master01 ~]# ipvsadm -Ln TCP 10.97.97.97:80 rr -> 10.244.1.39:80 Masq 1 0 0 -> 10.244.1.40:80 Masq 1 0 0 -> 10.244.2.33:80 Masq 1 0 0 # 访问10.97.97.97:80观察效果 [root@k8s-master01 ~]# curl 10.97.97.97:80 10.244.2.33
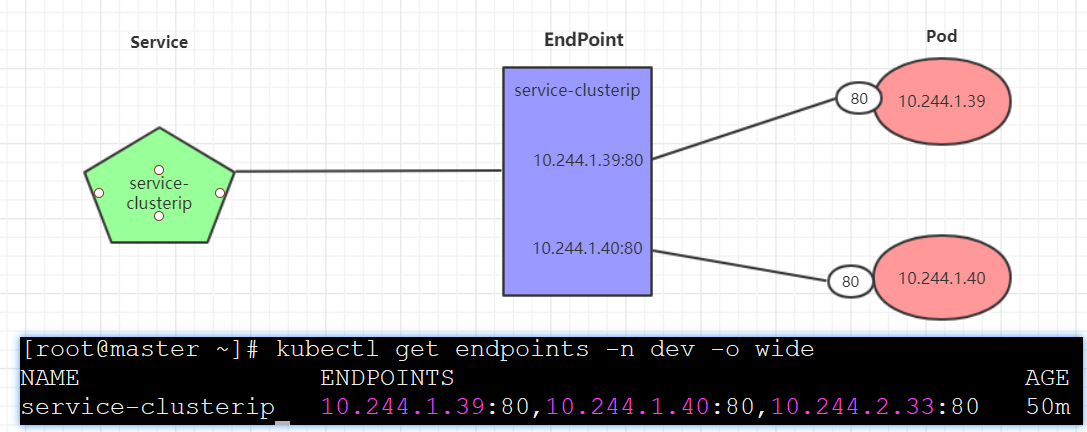
Endpoint
Endpoint是kubernetes中的一个资源对象,存储在etcd中,用来记录一个service对应的所有pod的访问地址,它是根据service配置文件中selector描述产生的。
一个Service由一组Pod组成,这些Pod通过Endpoints暴露出来,Endpoints是实现实际服务的端点集合 。换句话说,service和pod之间的联系是通过endpoints实现的。
负载分发策略
对Service的访问被分发到了后端的Pod上去,目前kubernetes提供了两种负载分发策略:
如果不定义,默认使用kube-proxy的策略,比如随机、轮询
基于客户端地址的会话保持模式,即来自同一个客户端发起的所有请求都会转发到固定的一个Pod上
此模式可以使在spec中添加 sessionAffinity:ClientIP选项
1
2
3
4
5
6
7
8
9
10
11
12
13
14
15
16
17
18
19
20
21
22
23
24
25
26
27
28
29
30
31
32
33
34
# 查看ipvs的映射规则【rr 轮询】 [root@k8s-master01 ~]# ipvsadm -Ln TCP 10.97.97.97:80 rr -> 10.244.1.39:80 Masq 1 0 0 -> 10.244.1.40:80 Masq 1 0 0 -> 10.244.2.33:80 Masq 1 0 0 # 循环访问测试 [root@k8s-master01 ~]# while true;do curl 10.97.97.97:80; sleep 5; done; 10.244.1.40 10.244.1.39 10.244.2.33 10.244.1.40 10.244.1.39 10.244.2.33 # 修改分发策略----sessionAffinity:ClientIP # 查看ipvs规则【persistent 代表持久】 [root@k8s-master01 ~]# ipvsadm -Ln TCP 10.97.97.97:80 rr persistent 10800 -> 10.244.1.39:80 Masq 1 0 0 -> 10.244.1.40:80 Masq 1 0 0 -> 10.244.2.33:80 Masq 1 0 0 # 循环访问测试 [root@k8s-master01 ~]# while true;do curl 10.97.97.97; sleep 5; done; 10.244.2.33 10.244.2.33 10.244.2.33 # 删除service [root@k8s-master01 ~]# kubectl delete -f service-clusterip.yaml service "service-clusterip" deleted
7.3.3 HeadLiness类型的Service 在某些场景中,开发人员可能不想使用Service提供的负载均衡功能,而希望自己来控制负载均衡策略,针对这种情况,kubernetes提供了HeadLiness Service,这类Service不会分配Cluster IP,如果想要访问service,只能通过service的域名进行查询。
创建service-headliness.yaml
1
2
3
4
5
6
7
8
9
10
11
12
13
apiVersion: v1 kind: Service metadata: name: service-headliness namespace: dev spec: selector: app: nginx-pod clusterIP: None type: ClusterIP ports: - port: 80 targetPort: 80
1
2
3
4
5
6
7
8
9
10
11
12
13
14
15
16
17
18
19
20
21
22
23
24
25
26
27
28
29
30
31
32
33
34
# 创建service [root@k8s-master01 ~]# kubectl create -f service-headliness.yaml service/service-headliness created # 获取service, 发现CLUSTER-IP未分配 [root@k8s-master01 ~]# kubectl get svc service-headliness -n dev -o wide NAME TYPE CLUSTER-IP EXTERNAL-IP PORT(S) AGE SELECTOR service-headliness ClusterIP None <none> 80/TCP 11s app=nginx-pod # 查看service详情 [root@k8s-master01 ~]# kubectl describe svc service-headliness -n dev Name: service-headliness Namespace: dev Labels: <none> Annotations: <none> Selector: app=nginx-pod Type: ClusterIP IP: None Port: <unset> 80/TCP TargetPort: 80/TCP Endpoints: 10.244.1.39:80,10.244.1.40:80,10.244.2.33:80 Session Affinity: None Events: <none> # 查看域名的解析情况 [root@k8s-master01 ~]# kubectl exec -it pc-deployment-66cb59b984-8p84h -n dev /bin/sh / # cat /etc/resolv.conf nameserver 10.96.0.10 search dev.svc.cluster.local svc.cluster.local cluster.local [root@k8s-master01 ~]# dig @10.96.0.10 service-headliness.dev.svc.cluster.local service-headliness.dev.svc.cluster.local. 30 IN A 10.244.1.40 service-headliness.dev.svc.cluster.local. 30 IN A 10.244.1.39 service-headliness.dev.svc.cluster.local. 30 IN A 10.244.2.33
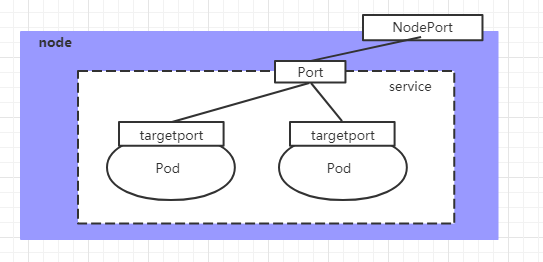
7.3.4 NodePort类型的Service 在之前的样例中,创建的Service的ip地址只有集群内部才可以访问,如果希望将Service暴露给集群外部使用,那么就要使用到另外一种类型的Service,称为NodePort类型。NodePort的工作原理其实就是将service的端口映射到Node的一个端口上 ,然后就可以通过 NodeIp:NodePort来访问service了。
创建service-nodeport.yaml
1
2
3
4
5
6
7
8
9
10
11
12
13
apiVersion: v1 kind: Service metadata: name: service-nodeport namespace: dev spec: selector: app: nginx-pod type: NodePort ports: - port: 80 nodePort: 30002 targetPort: 80
1
2
3
4
5
6
7
8
9
10
# 创建service [root@k8s-master01 ~]# kubectl create -f service-nodeport.yaml service/service-nodeport created # 查看service [root@k8s-master01 ~]# kubectl get svc -n dev -o wide NAME TYPE CLUSTER-IP EXTERNAL-IP PORT(S) SELECTOR service-nodeport NodePort 10.105.64.191 <none> 80:30002/TCP app=nginx-pod # 接下来可以通过电脑主机的浏览器去访问集群中任意一个nodeip的30002端口,即可访问到pod
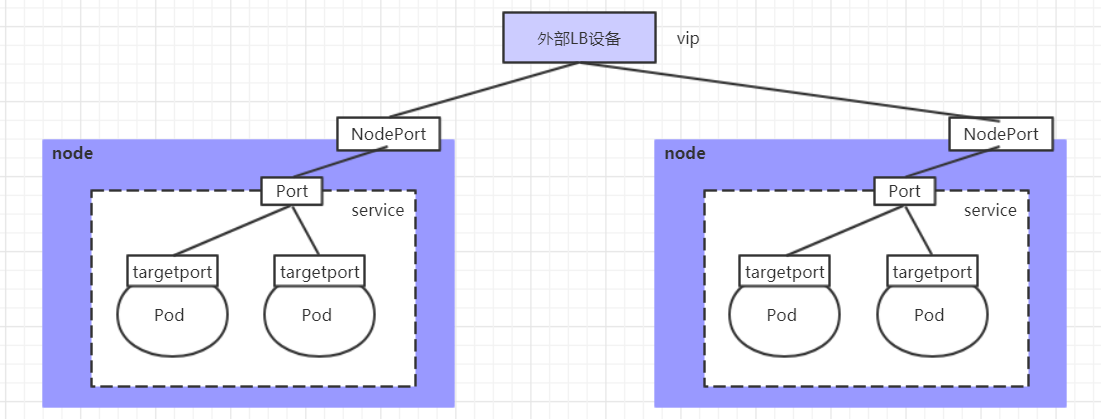
7.3.5 LoadBalancer类型的Service LoadBalancer和NodePort很相似,目的都是向外部暴露一个端口,区别在于LoadBalancer会在集群的外部再来做一个负载均衡设备,而这个设备需要外部环境支持的,外部服务发送到这个设备上的请求,会被设备负载之后转发到集群中。
7.3.6 ExternalName类型的Service ExternalName类型的Service用于引入集群外部的服务,它通过 externalName属性指定外部一个服务的地址,然后在集群内部访问此service就可以访问到外部的服务了。
1
2
3
4
5
6
7
8
apiVersion: v1 kind: Service metadata: name: service-externalname namespace: dev spec: type: ExternalName # service类型 externalName: www.baidu.com #改成ip地址也可以
1
2
3
4
5
6
7
8
9
10
# 创建service [root@k8s-master01 ~]# kubectl create -f service-externalname.yaml service/service-externalname created # 域名解析 [root@k8s-master01 ~]# dig @10.96.0.10 service-externalname.dev.svc.cluster.local service-externalname.dev.svc.cluster.local. 30 IN CNAME www.baidu.com. www.baidu.com. 30 IN CNAME www.a.shifen.com. www.a.shifen.com. 30 IN A 39.156.66.18 www.a.shifen.com. 30 IN A 39.156.66.14
7.4 Ingress介绍 在前面课程中已经提到,Service对集群之外暴露服务的主要方式有两种:NotePort和LoadBalancer,但是这两种方式,都有一定的缺点:
NodePort方式的缺点是会占用很多集群机器的端口,那么当集群服务变多的时候,这个缺点就愈发明显
LB方式的缺点是每个service需要一个LB,浪费、麻烦,并且需要kubernetes之外设备的支持
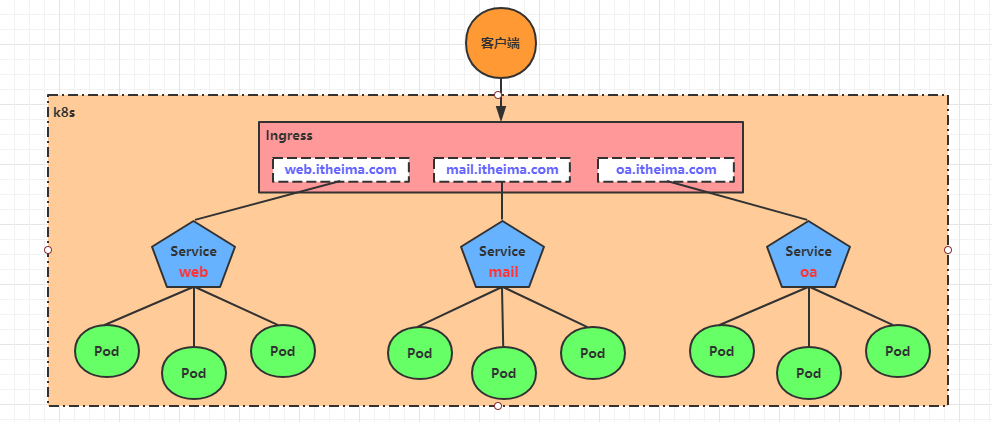
基于这种现状,kubernetes提供了Ingress资源对象,Ingress只需要一个NodePort或者一个LB就可以满足暴露多个Service的需求。工作机制大致如下图表示:
实际上,Ingress相当于一个7层的负载均衡器,是kubernetes对反向代理的一个抽象,它的工作原理类似于Nginx,可以理解成在Ingress里建立诸多映射规则,Ingress Controller通过监听这些配置规则并转化成Nginx的反向代理配置 , 然后对外部提供服务 。在这里有两个核心概念:
ingress:kubernetes中的一个对象,作用是定义请求如何转发到service的规则
ingress controller:具体实现反向代理及负载均衡的程序,对ingress定义的规则进行解析,根据配置的规则来实现请求转发,实现方式有很多,比如Nginx, Contour, Haproxy等等
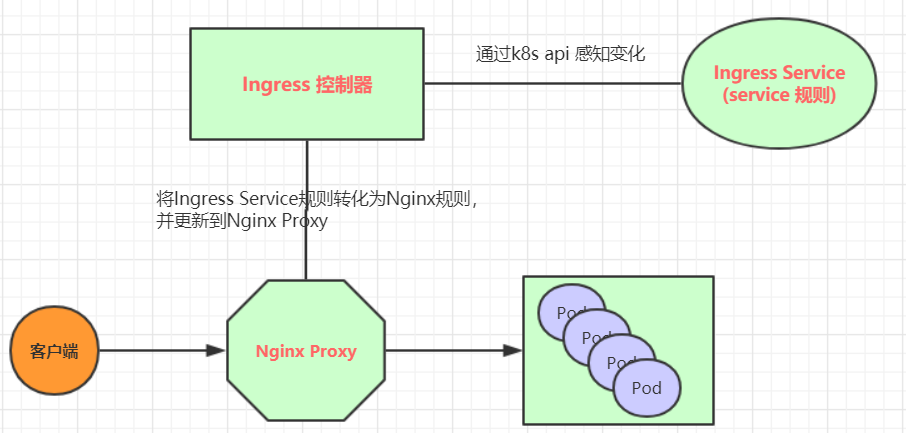
Ingress(以Nginx为例)的工作原理如下:
用户编写Ingress规则,说明哪个域名对应kubernetes集群中的哪个Service
Ingress控制器动态感知Ingress服务规则的变化,然后生成一段对应的Nginx反向代理配置
Ingress控制器会将生成的Nginx配置写入到一个运行着的Nginx服务中,并动态更新
到此为止,其实真正在工作的就是一个Nginx了,内部配置了用户定义的请求转发规则
7.5 Ingress使用 7.5.1 环境准备 搭建ingress环境
1
2
3
4
5
6
7
8
9
10
11
12
13
14
15
16
17
18
19
20
21
22
23
# 创建文件夹 [root@k8s-master01 ~]# mkdir ingress-controller [root@k8s-master01 ~]# cd ingress-controller/ # 获取ingress-nginx,本次案例使用的是0.30版本 [root@k8s-master01 ingress-controller]# wget https://raw.githubusercontent.com/kubernetes/ingress-nginx/nginx-0.30.0/deploy/static/mandatory.yaml [root@k8s-master01 ingress-controller]# wget https://raw.githubusercontent.com/kubernetes/ingress-nginx/nginx-0.30.0/deploy/static/provider/baremetal/service-nodeport.yaml # 修改mandatory.yaml文件中的仓库 # 修改quay.io/kubernetes-ingress-controller/nginx-ingress-controller:0.30.0 # 为quay-mirror.qiniu.com/kubernetes-ingress-controller/nginx-ingress-controller:0.30.0 # 创建ingress-nginx [root@k8s-master01 ingress-controller]# kubectl apply -f ./ # 查看ingress-nginx [root@k8s-master01 ingress-controller]# kubectl get pod -n ingress-nginx NAME READY STATUS RESTARTS AGE pod/nginx-ingress-controller-fbf967dd5-4qpbp 1/1 Running 0 12h # 查看service [root@k8s-master01 ingress-controller]# kubectl get svc -n ingress-nginx NAME TYPE CLUSTER-IP EXTERNAL-IP PORT(S) AGE ingress-nginx NodePort 10.98.75.163 <none> 80:32240/TCP,443:31335/TCP 11h
准备service和pod
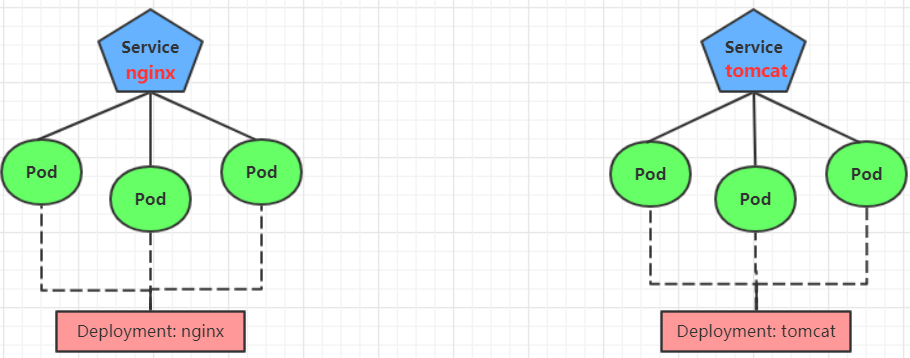
为了后面的实验比较方便,创建如下图所示的模型
创建tomcat-nginx.yaml
1
2
3
4
5
6
7
8
9
10
11
12
13
14
15
16
17
18
19
20
21
22
23
24
25
26
27
28
29
30
31
32
33
34
35
36
37
38
39
40
41
42
43
44
45
46
47
48
49
50
51
52
53
54
55
56
57
58
59
60
61
62
63
64
65
66
67
68
69
70
71
72
73
74
75
apiVersion: apps/v1 kind: Deployment metadata: name: nginx-deployment namespace: dev spec: replicas: 3 selector: matchLabels: app: nginx-pod template: metadata: labels: app: nginx-pod spec: containers: - name: nginx image: nginx:1.17.1 ports: - containerPort: 80 --- apiVersion: apps/v1 kind: Deployment metadata: name: tomcat-deployment namespace: dev spec: replicas: 3 selector: matchLabels: app: tomcat-pod template: metadata: labels: app: tomcat-pod spec: containers: - name: tomcat image: tomcat:8.5-jre10-slim ports: - containerPort: 8080 --- apiVersion: v1 kind: Service metadata: name: nginx-service namespace: dev spec: selector: app: nginx-pod clusterIP: None type: ClusterIP ports: - port: 80 targetPort: 80 --- apiVersion: v1 kind: Service metadata: name: tomcat-service namespace: dev spec: selector: app: tomcat-pod clusterIP: None type: ClusterIP ports: - port: 8080 targetPort: 8080
1
2
3
4
5
6
7
8
# 创建 [root@k8s-master01 ~]# kubectl create -f tomcat-nginx.yaml # 查看 [root@k8s-master01 ~]# kubectl get svc -n dev NAME TYPE CLUSTER-IP EXTERNAL-IP PORT(S) AGE nginx-service ClusterIP None <none> 80/TCP 48s tomcat-service ClusterIP None <none> 8080/TCP 48s
7.5.2 Http代理
RFC 3986..foo.com”). The wildcard character ‘ ‘ must appear by itself as the first DNS label and matches only a single label. You cannot have a wildcard label by itself (e.g. Host == “*”). Requests will be matched against the Host field in the following way:
创建ingress-http.yaml
1
2
3
4
5
6
7
8
9
10
11
12
13
14
15
16
17
18
19
20
21
apiVersion: extensions/v1beta1 kind: Ingress metadata: name: ingress-http namespace: dev spec: rules: - host: nginx.itheima.com http: paths: - path: / backend: serviceName: nginx-service servicePort: 80 - host: tomcat.itheima.com http: paths: - path: / backend: serviceName: tomcat-service servicePort: 8080
1
2
3
4
5
6
7
8
9
10
11
12
13
14
15
16
17
18
19
20
21
# 创建 [root@k8s-master01 ~]# kubectl create -f ingress-http.yaml ingress.extensions/ingress-http created # 查看 [root@k8s-master01 ~]# kubectl get ing ingress-http -n dev NAME HOSTS ADDRESS PORTS AGE ingress-http nginx.itheima.com,tomcat.itheima.com 80 22s # 查看详情 [root@k8s-master01 ~]# kubectl describe ing ingress-http -n dev ... Rules: Host Path Backends ---- ---- -------- nginx.itheima.com / nginx-service:80 (10.244.1.96:80,10.244.1.97:80,10.244.2.112:80) tomcat.itheima.com / tomcat-service:8080(10.244.1.94:8080,10.244.1.95:8080,10.244.2.111:8080) ... # 接下来,在本地电脑上配置host文件,解析上面的两个域名到192.168.109.100(master)上 # 然后,就可以分别访问tomcat.itheima.com:32240 和 nginx.itheima.com:32240 查看效果了
7.5.3 Https代理 创建证书
1
2
3
4
5
# 生成证书 openssl req -x509 -sha256 -nodes -days 365 -newkey rsa:2048 -keyout tls.key -out tls.crt -subj "/C=CN/ST=BJ/L=BJ/O=nginx/CN=itheima.com" # 创建密钥 kubectl create secret tls tls-secret --key tls.key --cert tls.crt
创建ingress-https.yaml
1
2
3
4
5
6
7
8
9
10
11
12
13
14
15
16
17
18
19
20
21
22
23
24
25
26
apiVersion: extensions/v1beta1 kind: Ingress metadata: name: ingress-https namespace: dev spec: tls: - hosts: - nginx.itheima.com - tomcat.itheima.com secretName: tls-secret rules: - host: nginx.itheima.com http: paths: - path: / backend: serviceName: nginx-service servicePort: 80 - host: tomcat.itheima.com http: paths: - path: / backend: serviceName: tomcat-service servicePort: 8080
1
2
3
4
5
6
7
8
9
10
11
12
13
14
15
16
17
18
19
20
21
22
# 创建 [root@k8s-master01 ~]# kubectl create -f ingress-https.yaml ingress.extensions/ingress-https created # 查看 [root@k8s-master01 ~]# kubectl get ing ingress-https -n dev NAME HOSTS ADDRESS PORTS AGE ingress-https nginx.itheima.com,tomcat.itheima.com 10.104.184.38 80, 443 2m42s # 查看详情 [root@k8s-master01 ~]# kubectl describe ing ingress-https -n dev ... TLS: tls-secret terminates nginx.itheima.com,tomcat.itheima.com Rules: Host Path Backends ---- ---- -------- nginx.itheima.com / nginx-service:80 (10.244.1.97:80,10.244.1.98:80,10.244.2.119:80) tomcat.itheima.com / tomcat-service:8080(10.244.1.99:8080,10.244.2.117:8080,10.244.2.120:8080) ... # 下面可以通过浏览器访问https://nginx.itheima.com:31335 和 https://tomcat.itheima.com:31335来查看了